
Proper Attic Ventilation
If you’re searching for proper attic ventilation you’re likely a home owner trying to understand why you’d need attic insulation and how much you’ll need. This post will introduce the type of attic ventilation that our team can install.
Natural Ventilation
It may be a bit odd to just add insulation for warmth and then just allow cold air to get into your home through vents, but this is actually a critical part to an energy efficient and durable home. This is why: During the winter, letting there be a natural flow of outdoor air to ventilate your attic will help to keep the attic cold, which actually reduces the potential for any ice damming. Ice damming is when snow melts off of the roof from an attic that is actually too warm and then refreezes within the gutters which causes a dam that can damage your roof. Having the right insulation and air sealing can even keep your attic cold during winter by blocking any entry of moist air and heat from in your home. During the summer, the air flow in a vented attic will move all the super-heated air out of your attic, which removes moisture and protects the shingles on your roof. The insulation will then resist any heat transfer into your home.
A very common mistake that a home owner can make when installing any insulation is to block up the air flow at the eaves. You never want to cover any attic vents with insulation. You need to use soffit and rafter vents to maintain air flow.
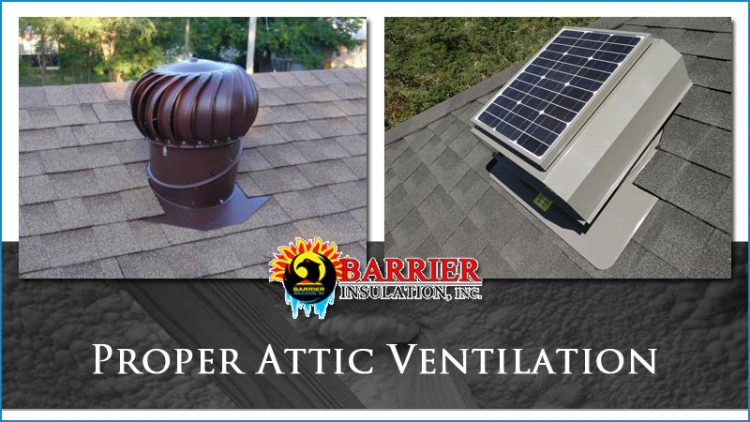
Fan Ventilation
An attic fan is used to cool down a hot attic by taking in cooler air from outside through attic vents and then pushing all the hot air outside. However, if your attic happens to have any blocked vents and it isn’t well sealed from your home, then attic fans will suck up your air-conditioned air out of your home and into your attic. This causes you to use more energy and makes your AC work much harder, which causes your electric bill to go up.
You do not want an unfinished attic to be cooled by your AC. To keep this from happening, follow the insulation and sealing strategies to ensure that your attic is ventilated using natural air flow and passive vents.
Doing the Job Yourself
Putting in fiberglass rolls will be the easiest for any DIY project. If you have any insulation between your rafters, install your second layer over it and make sure it is perpendicular to the first layer. This will help to cover joists and reduce any heat gain or heat loss through the frame. Whenever you are adding additional insulation, you will want to work from the opening in the attic. Never lay any insulation over soffit vents or recessed light fixtures. You want to keep the insulation around 5 inches from any type of can lights, unless it has been rated for insulated ceiling. If you happen to be using loose fill insulation, then you can use sheet metal to create a type of barrier around the openings. If you are using fiberglass insulation, then wire mesh can be used to create barriers.
Hiring Barrier Insulation
Barrier Insulation is happy to help Phoenix Valley residents stay more comfortable and have more energy efficient homes through installing attic ventilation. Our team can handle all the details from attic volume calculations and choosing the vents or fans to the proper installation of your attic ventilation. We will handle every conceivable detail for you so that all you need to do is focus on your day and we take care of the work. We get it done faster and with less disruption to the conditions in your home.
Insulating a Rafter Vent
In order to cover the attic floor using insulation out of eaves, you will have to install rafter vents. Complete coverage of your attic floor as well as sealing up air leaks will make sure that you get the best type of performance from the insulation. Rafter vents will make sure that your soffit vents are clear and that there will be somewhere for outside air to come into the attic and out through the ridge vent. In order to install a rafter vent, you will just staple them directly to your decking on the roof. A rafter vent will come in either 4 ft by 14 ½ inches or 4 ft by 22 ½ inches for various rafter spacing. The rafter vent needs to be placed in the ceiling of the attic between rafters at the point where the floor meets the ceiling.
Once the vent is in place, then you can add blankets or batts, or even blow insulation, right out to the edge of the attic floor. You should note that blown insulation could need an additional block to keep the insulation from being blown into the soffit vent. You can place foam board on the outer edge which works really well.
Placing Rafter Vents
You can place a rafter vent between the rafters where the floor will meet the ceiling.
Adding Insulation
You can add insulation around the rafter vent and out to the edge of the attic floor. The added insulation will help ensure that your home stays comfortable and energy efficient.
Attic Ventilation Installation Service
Allow our team of experts to come to your home and assess your attic ventilation needs. We can help you choose the type of ventilation you need, how much, and do the installation for you to make your home comfortable and energy efficient. To learn more please visit our attic ventilation page or give us a call at 602-499-2922.